Epiphany / Trigger & Grip Frame
Trigger & Grip Frame
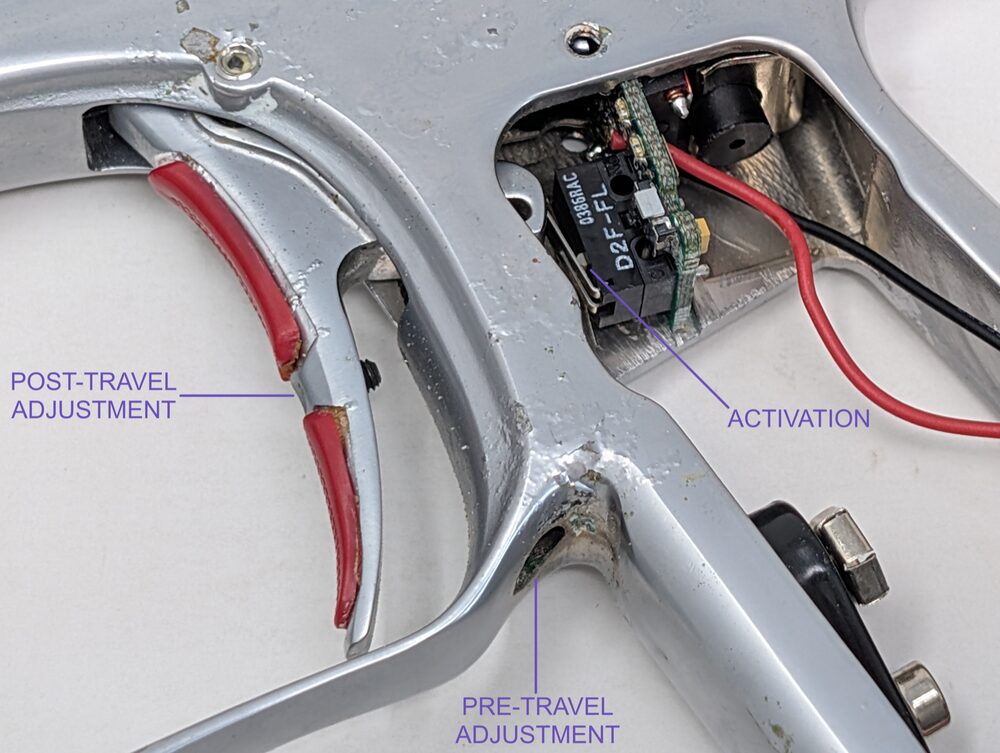
The Epiphany's conical bearing-mount trigger has three adjustment points — pre-travel, post-travel, and activation point — versus the standard Ion's two set screws. Only the EOS shares this trigger design.
Pre-travel
Located where the trigger guard meets the grip frame, adjusted with a 1/8" hex key — no need to remove the grip to reach it, unlike the standard Ion's equivalent screw, since the Epiphany's grip is a thinner design that doesn't block access. Clockwise shortens the distance the trigger travels before activating the switch; counter-clockwise lengthens it. Don't turn this in too far, or the trigger won't reliably reset after each shot.
Post-travel
In the center of the trigger itself, adjusted with a 3/64" hex key. Controls how far the trigger travels after activating the switch. This and the activation point need to be set together so the trigger stops solidly against the grip frame — get this wrong and you risk switch damage.
Activation point
Determines exactly where in the pull the switch fires. This one requires disassembly — degas, then remove the receiver, circuit board, grips, and battery per Teardown. The screw is on the rear of the trigger itself, adjusted with a 3/64" hex key.
Removing or replacing the trigger
Fully de-gas the marker first, then disassemble the grips, grip frame, and circuit board per Teardown. With that done, back out the two centering screws (5/64" hex key) on either side of the grip frame that lock into the trigger's roller bearing, then lift the trigger out through the top. When reinstalling, tighten both screws evenly — uneven tightening presses the trigger against one side of the frame and causes binding or drag. Secure with threadlocker.
If the trigger won't reset forward
The activation point screw is likely adjusted too far toward the rear — turn it further in.
If the trigger won't fire the marker
With the marker off, the trigger switch should audibly click when pulled. If it doesn't, back the pre-travel and post-travel screws out until it does, then re-set properly. If it still doesn't fire, the trigger switch itself may be damaged — this is a circuit-board-level repair, not something to attempt without soldering experience.
Power button
The Epiphany ships stock with the plastic push-button — see On/Off Buttons — rather than the standard Ion's sticker. It snaps in and out at will, with no adhesive involved, so removal and reinstallation is just a matter of popping it free from the grip frame and pressing the replacement back in. Sticker-style buttons don't fit the Epiphany at all — there's no stock sticker to begin with, and a replacement here always means another Epiphany-style plastic button, not the aftermarket sticker options available for the standard Ion.